Skin Puncture and Blood Collection for Infants
- 1990
These captions and transcript were generated by a computer and may contain errors. If there are significant errors that should be corrected, please let us know by emailing digital@sciencehistory.org.
Transcript
00:00:13 In this tape, we wish to teach you the proper techniques for skin puncture and blood collection in children, particularly of the newborn.
00:00:20 By way of introduction, let us look at a slide of a newborn's heels.
00:00:24 This slide was made at the autopsy of the infant. Disregarding the bruising that is apparent,
00:00:31 there are two glaring errors obviously made during the skin punctures that you must learn to avoid.
00:00:35 Can you pick out the mistakes? By the end of this tape, you should be able to do it.
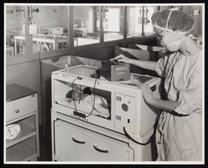
00:00:40 Hello, I'm Daniel Mann, Administrative Director of Laboratory Services.
00:00:45 Throughout this presentation, you will watch Karis Glassco of our chemistry section go through the entire process of collecting blood by skin puncture for carrying out laboratory tests.
00:00:55 The term skin puncture is preferred over capillary puncture because the puncture penetrates the skin and underlying tissues, as well as blood capillaries.
00:01:04 Practically all tests in our sections of chemistry and hematology, except for COAG and therapeutic drug monitoring, more than 700,000 tests annually are performed on blood collected by skin puncture.
00:01:17 Why do we do this? For the newborn, children less than one month old, and the infant, children less than two years old, there are several important reasons. I'll mention three of them.
00:01:28 Number one, veins and arteries are used for IV therapy. Almost all newborns and infants get such therapy in this hospital and the few available veins and arteries must be saved exclusively for this purpose.
00:01:39 Overall, nearly 60% of patients of all ages at Children's Hospital receive IV therapy.
00:01:46 The second reason is that the puncture of the tiny veins and arteries of the newborn is a dangerous and difficult technique.
00:01:53 Improper technique has led to documented conditions such as thrombosis, hemorrhage, infection, damage to surrounding tissues and organs, gangrene of the extremity, and even cardiac arrest.
00:02:04 The third reason, a lesser though still important reason, is to avoid the veins and arteries of the infant in that the skin puncture is much faster as well as easier to do.
00:02:16 For the newborn, the heel is the only site permitted for skin puncture.
00:02:20 As we shall explain, once the heel of the infant becomes too calloused for skin puncture around six to eight months
00:02:27 Then the skin puncture of the finger and infrequently great toe must be done.
00:02:31 The earlobe of the younger infant is too small for use and cannot be used in older children unless it is pre-warmed to increase the circulatory rate to overcome blood stasis.
00:02:41 We have rarely used the earlobe as a source of blood.
00:02:44.000 --> 00:02:53.000
Now I would like to take you through the main facts of skin puncture and blood collection so that you can gain confidence that you are using our most up-to-date acceptable techniques and equipment
00:02:54 based on recent scientific studies as well as on nationally approved consistent standards that you will have a chance to examine yourself.
00:03:03 Let's begin with the collecting tray.
00:03:05 The phlebotomist obtains a draw list and a set of labels from the central accessioning desk and puts those on the tray.
00:03:12 The following items are included on the tray.
00:03:15 Lancets, sterile alcohol preps, these contain 70% isopropanol, sterile gauze sponges, various tubes to hold blood.
00:03:24 For chemistry and most of the TDM sections, we used big, the hard blues, little blues, natals and capillary tubes with the end caps.
00:03:33 These are all heparinized.
00:03:35 For amylase, use little white, non-heparinized tubes, about 250 microliters.
00:03:42 For hematology, except for the COAG tests, use the purple top tubes containing EDTA.
00:03:48 Use the big blue for the G6PD and sickle cell tests.
00:03:51 Slides are also provided for preparing blood films.
00:03:55 For transfusion service and some of the TDM tests, we also use clear glass microtubes with quartz.
00:04:01 Sharp's disposal container is also available for use with discarding lancets and pads.
00:04:07 These items must later be disposed of in the biohazard containers in the laboratory.
00:04:12 Also included is an ice water unit.
00:04:15 This holds pH blood gas capillary tubes after they've been filled.
00:04:18 If the patient must be restocked, always use a new sterile lancet.
00:04:23 For patients in strict isolation, dispose of these lancets and pads in the biohazard container provided in the patient's room.
00:04:30 Clean your collecting tray weekly using disinfectant cleaner provided.
00:04:34 Do not take your tray into any room on the infectious disease unit on 6A East or West or in any area of strict isolation.
00:04:42 Never put your tray on a patient's bed.
00:04:45 Now let's get specific about the subject infectious control techniques.
00:04:49 We cannot be too repetitious about this subject.
00:04:52 You and all other hospital personnel are responsible for preventing the transmission of infection to patients and staff, including yourself.
00:05:00 The easiest, most effective way to accomplish this is through the use of good hand washing technique.
00:05:06 Follow all the isolation precautions provided in each ward.
00:05:10 On the two tower neonatal and surgical units, you must wash your hands.
00:05:18 Put on yellow isolation gowns.
00:05:21 Note that you wash your hands before and after each patient contact.
00:05:26 After entering a patient's area, put on gloves.
00:05:29 Change those gloves after each patient collection.
00:05:32 When special precautions are indicated, change gowns after each patient has been serviced
00:05:37 or if your gown is noticeably soiled with blood.
00:05:41 On the infectious disease units, in addition to the preceding instructions,
00:05:45 you also must, when required by the isolation category, wear a mask as well as the isolation gown and gloves.
00:05:52 You also need to take only the needed disposable material into the patient's room, but not the collecting tray.
00:06:00 You must discard the used lancets and pads in the biohazard container provided in the room.
00:06:05 Also, transport the specimens collected in the infectious disease wards in cups and plastic bags.
00:06:11 Observe the precautions indicated for all other units such as hematology on 5A East or the three tower north burn unit.
00:06:19 Let's deal now with bedside technique.
00:06:22 If the test orders require that the tubes containing blood be placed in ice water,
00:06:28 first obtain ice from the ice machine on the unit and put it in the appropriate container.
00:06:32 The container may be one that you bring along in your tray,
00:06:36 but improvised containers may also be obtained on the unit.
00:06:39 These containers could include plastic emesis containers, paper drinking cups, and Ziploc bags.
00:06:45 A little water should be added to ensure that the ice water will be near zero degrees centigrade.
00:06:51 Identification of the patient is a very important step.
00:06:55 This step is critical.
00:06:57 You must verify the name and hospital number of each patient from whom you obtain a specimen.
00:07:02 Check the name on the label with the patient's wrist or ankle band.
00:07:06 Do not, I repeat, do not accept the name on the bed or on the door because these may be accidentally switched.
00:07:13 If the patient does not have an identification band,
00:07:16 then you must ask a member of the nursing unit to identify the patient,
00:07:19 preferably either the patient's nurse or the charge nurse.
00:07:23 Note, if the patient or parent refuses or even questions your right to collect blood samples,
00:07:29 do not attempt to collect blood.
00:07:30 If simple explanation fails, that is, the doctor's orders were replaced
00:07:36 or that the doctor decided that the cause or treatment of the disease requires blood collection,
00:07:41 then notify the charge nurse or the patient's nurse of the problem and leave the patient.
00:07:46 Another note, if the parents or anyone questions you concerning interpretation of the test ordered,
00:07:52 tell them tactfully, I repeat tactfully, that such questions should be addressed to their doctor
00:07:57 because he or she is more qualified to explain the reasons for collecting the blood to the parent.
00:08:04 For many tests, it's necessary to pre-warm the puncture site.
00:08:09 For blood gases, for the pH, the PCO2 and the PO2, the puncture site must be pre-warmed.
00:08:15 Warming increases the rate of arterial blood flow through the area of the puncture site.
00:08:20 It also causes more blood to be obtained for the puncture.
00:08:23 You can tell that the warming is successful because the site becomes redder than it was.
00:08:28 Use a washcloth soaked in hot running tap water, approximately 39 to 41 degrees centigrade.
00:08:34 That must be comfortable to your touch.
00:08:37 Wrap the foot or the hand in the cloth to avoid soaking the bed.
00:08:41 Now before we actually illustrate a skin puncture technique,
00:08:45 I'd like to introduce a member of the staff of Atomic Pathology, Dr. Charles Reiner.
00:08:49 He will illustrate the anatomy of this puncture site, specifically the skin of the heel.
00:08:56 I'd like to discuss with you the sites one chooses for skin puncture
00:09:01 based on consensus views and the few anatomical studies
00:09:05 that have been made in support of these sites, including our own study.
00:09:10 A broadly represented group established in 1967,
00:09:14 the National Committee on Clinical Laboratory Standards, NCCLS,
00:09:20 has in 1986 approved a standard entitled
00:09:26 Procedures for the Collection of Diagnostic Blood Specimens by Skin Puncture
00:09:32 and a guideline entitled Use of Devices for Collection of Skin Puncture Blood Specimens.
00:09:40 The NCCLS is a widely diversified voluntary organization
00:09:46 consisting of people in the clinical products industry, academic medicine,
00:09:51 hospital clinical laboratories, and other related places.
00:09:56 They have established expert consensus committees
00:10:01 in many aspects of the field of clinical laboratory medicine
00:10:04 with the aim of providing uniform standards of quality and manufacture and approved technology.
00:10:12 They have, for example, proposed standards or guidelines on such diverse topics
00:10:19 as the protection of laboratory workers against work-related infection,
00:10:24 antifungal susceptibility testing,
00:10:28 specification for standardized protein solutions,
00:10:31 and collection containers for specimens for toxicological analysis.
00:10:37 Before discussing the NCCLS proposal for blood collection by skin puncture,
00:10:44 let's look at the anatomy of the heel, the only puncture site useful in the newborn
00:10:49 and in infants up to about six months of age,
00:10:53 after which thicker callus may prevent its use.
00:10:57 I have here an infant for demonstration.
00:11:02 This is probably the most cooperative infant you'll ever come across.
00:11:07 It doesn't wet. It doesn't soil.
00:11:11 And it requires no food.
00:11:14 And it is a he, and it's quite anatomically correct, you see.
00:11:20 So that when I refer to he, I am not being...
00:11:26 a sexist. This is a he doll.
00:11:30 Now, the area that is used in heel puncture
00:11:38 can be outlined by drawing an imaginary line
00:11:44 through the middle of the great toe parallel to the medial aspect of the foot
00:11:53 in this area.
00:11:57 And the lateral aspect of the foot
00:12:03 by drawing an imaginary line between the fourth and fifth toes,
00:12:09 also parallel to the, in this case, to the lateral margin of the foot.
00:12:15 And that outlines an area that may be used for
00:12:21 And that outlines an area that may be used for skin puncture.
00:12:28 The area you wish to avoid is this posterior area
00:12:33 because the soft tissues in this area are much thinner
00:12:38 than they are in the medial and lateral aspects of the heel.
00:12:44 So remember you do not use the posterior aspect of the heel
00:12:50 only the lateral and medial aspects.
00:12:56 To summarize some of the do's and don'ts in heel puncture
00:13:01 and add a few more, we do puncture in this area laterally
00:13:07 and this area medially.
00:13:10 We do not puncture posteriorly, and we do not puncture
00:13:14 on the medial and lateral aspects of the foot.
00:13:18 Only on the plantar surface of the heel.
00:13:23 The shortest distance found at the posterior site
00:13:27 between skin surface and bone in a study made on 35 newborn infants
00:13:32 at necropsy was 2.4 millimeters.
00:13:36 The reason this measurement is important
00:13:39 is one wishes to avoid injury to cartilage and bone
00:13:43 which underlies these soft tissues.
00:13:46 There have been cases of chondritis and osteomyelitis
00:13:50 that have resulted from penetrating too deeply
00:13:54 and hitting cartilage and or bone.
00:13:58 Hence the NCCLS recommends that manufacturers of blood lancets
00:14:03 make them with tips not exceeding 2.4 millimeters.
00:14:08 Our own findings on 14 newborns at necropsy
00:14:12 included four infants with skin surface to bone distance
00:14:16 between 2.0 and 2.2 millimeters
00:14:20 suggesting the need for even shorter tips.
00:14:24 Additionally, the use of greater pressure on the lancet
00:14:28 during puncture produces deeper penetration
00:14:32 by greater compression of the soft tissues
00:14:35 despite the limiting shield on the lancet.
00:14:38 For these reasons, therefore,
00:14:41 avoid puncture of the unshaded areas
00:14:44 on the plantar surface of the heel
00:14:47 to minimize the chance of injuring the oscalsis.
00:14:51 To repeat this demonstration of the proper area
00:14:55 for heel puncture in an infant
00:14:59 using this diagram obtained from the literature,
00:15:04 the imaginary line to the middle of the great toe
00:15:08 parallel to the medial margin of the foot
00:15:13 subtends a portion of the plantar surface of the heel
00:15:19 marked by this hatched area
00:15:22 which is suitable for skin puncture.
00:15:25 And the line between the fourth and fifth toes
00:15:29 parallel to the lateral aspect of the foot
00:15:33 subtends a portion of the plantar aspect
00:15:38 of the lateral part of the heel
00:15:42 which is suitable for skin puncture
00:15:46 marked by this hatched area.
00:15:49 Remember that you do not go,
00:15:52 you do not use the medial aspect of the heel
00:15:56 or the lateral aspect of the heel
00:15:59 except for the plantar surface
00:16:02 and you also do not use this posterior aspect of the heel
00:16:10 because of the shortness of the distance
00:16:14 between the surface of the skin
00:16:17 and the cartilage or bone in this area.
00:16:21 This is an x-ray of the foot of an infant
00:16:26 at autopsy.
00:16:29 This is the oscalsis or heel bone.
00:16:34 This metal wire was inserted to the skin surface
00:16:40 marked by this line
00:16:42 down to the cartilage marked by this line.
00:16:46 So from this point to this point
00:16:50 it is cartilage and this is bone.
00:16:58 One thing we wish to avoid
00:17:01 in capillary puncture of the heel or any place
00:17:04 for that matter
00:17:06 is injuring cartilage or bone.
00:17:09 Therefore we want our lancets to be short enough
00:17:14 and the pressure applied suitable
00:17:17 so that cartilage and or bone
00:17:20 are not reached with the needle and injured.
00:17:25 This is a photomicrograph of skin.
00:17:31 The skin consists or integument,
00:17:34 skin and integument are synonymous,
00:17:37 consists of epidermis, dermis
00:17:43 and this is the subcutaneous fat.
00:17:46 This is deeper tissue.
00:17:49 In this case it's skeletal muscle.
00:17:52 It could be bone or cartilage.
00:17:56 In the case of the heel it would be bone or cartilage.
00:18:00 This particular skin is taken elsewhere on the body
00:18:06 than the plantar surface, the sole of the foot
00:18:10 or palmar surface, the palm of the hand.
00:18:14 This is evidenced by the presence of hair follicles
00:18:18 and sebaceous glands.
00:18:21 These are sweat glands.
00:18:27 So we have epidermis
00:18:30 and we have these papillations
00:18:33 which are extensions of dermis up into the epidermis.
00:18:37 We have the dermis
00:18:40 and then we have the subcutaneous fat.
00:18:45 Shortly we will show you a diagram of skin
00:18:48 outlining the capillary plexuses
00:18:51 which are located in these papillae of dermis
00:18:56 and in the dermal subcutaneous junction.
00:19:00 This is a photomicrograph of the skin
00:19:04 of the plantar surface of the foot.
00:19:07 There are some differences from skin elsewhere in the body.
00:19:12 First this is the dermis
00:19:15 Notice that the stratum corneum or horny layer
00:19:19 of the skin, the cornified layer of the skin
00:19:23 is much thicker here than it is elsewhere in the body.
00:19:27 Notice also that there are sweat glands
00:19:31 and sweat ducts but no hair follicles
00:19:35 or sebaceous glands in the plantar surface.
00:19:39 Again the areas of the dermis
00:19:42 Again the areas of interest
00:19:46 concerning vascular plexuses, capillary plexuses
00:19:50 are in the papillae of the dermis
00:19:54 and at the dermal subcutaneous junction.
00:19:59 This is a diagram of skin
00:20:03 in which the epidermis has been diagrammatically
00:20:07 lifted up off the dermis.
00:20:09 This is epidermis, this is dermis
00:20:13 and this is subcutaneous fatty tissue.
00:20:17 Notice that the vascular plexuses that you're interested in
00:20:22 involve these papillae and slightly deeper
00:20:26 the vessels are slightly deeper to the papillae
00:20:30 and the deep portion of the dermis
00:20:34 near the dermal subcutaneous junction.
00:20:39 In the skin puncture for capillary blood
00:20:43 we are interested in puncturing
00:20:47 this plexus of vessels
00:20:51 and this deeper plexus of vessels
00:20:55 but we are not interested in going deeper
00:20:59 into the subcutaneous tissue
00:21:03 and the length of the stylet should be such
00:21:06 that we don't go deep into deeper tissues.
00:21:10 Deep to this subcutaneous fat
00:21:14 would be fascia, connective tissue
00:21:18 and cartilage or bone
00:21:22 and that is what we are trying to avoid in skin puncture.
00:21:26 The distance between the skin surface
00:21:30 and the deep vascular plexus
00:21:33 or the deep dermis
00:21:37 is approximately 1.6 millimeters.
00:21:41 There is little need to puncture deeper than this capillary bed
00:21:45 so we believe that the lancet tips can justifiably
00:21:49 be made less than 2.4 millimeters for the newborn.
00:21:53 We have here a monolet and a neolet
00:21:57 which I'm sure the patients call dontlets.
00:22:00 The neolet is a lancet,
00:22:04 disposable lancet,
00:22:08 which we hope will be produced
00:22:12 and has a much shorter tip
00:22:16 than the already produced monolet.
00:22:20 The blue is the monolet
00:22:24 which is already in use.
00:22:27 The pink is the neolet
00:22:31 which we hope will be produced
00:22:35 and you can see the difference in the lengths of those lancets.
00:22:39 We and two other pediatric laboratories
00:22:43 have already evaluated the neolet
00:22:47 and found it to be suitable.
00:22:51 I must make an important precautionary note
00:22:54 that for the newborn the distance from skin surface to bone
00:22:58 can be up to twice as great in the heel
00:23:02 as it is in the finger or great toe
00:23:06 and therefore the heel is the accepted site for skin punctures.
00:23:10 If you are told to use fingers or toes in the newborn
00:23:14 you should hold such a request
00:23:18 until the requesting physician has discussed this matter
00:23:21 with the laboratory director.
00:23:25 After the heel skin becomes calloused at about six months of age
00:23:29 we must begin using fingers for skin puncture.
00:23:33 The NCCLS recommends that the fleshy part
00:23:37 of the mid finger tip be used first.
00:23:41 Again, stay away from the rim or sides of the finger.
00:23:45 The thumb or great toe should be the last choice.
00:23:49 The ear lobe, which is used by the Red Cross
00:23:53 in taking blood prior to blood donation
00:23:57 cannot be used unless it is pre-warmed
00:24:01 to stimulate circulation, which is a lot more difficult to do
00:24:05 and much more time consuming.
00:24:09 Otherwise the results from the laboratory tests may be false.
00:24:12 If there is any edema present at the site of skin puncture
00:24:16 the site cannot be used for obvious reasons
00:24:20 of dilution of the blood specimen with tissue juices.
00:24:24 In this event, the patient's nurse or the charge nurse
00:24:28 must be notified and a venipuncture may be required.
00:24:32 For further details on skin puncture
00:24:36 we now switch to the ad hoc,
00:24:39 Laboratory Committee on Skin Puncture.
00:24:43 Our charming and delightful vampires,
00:24:47 Carlotta Thompson, Debbie Messer,
00:24:51 Teresa Cooper, and Karis Glasgow.
00:24:55 I'd like to talk about puncture site preparation.
00:24:59 First clean the puncture site thoroughly
00:25:03 with a sterile alcohol prep, a pad saturated with 70% alcohol.
00:25:06 The site is then wiped dry, and I mean dry
00:25:10 with a sterile gauze sponge.
00:25:14 Avoid wiping from an uncleaned to a cleaned area
00:25:18 as this contaminates the cleaned area.
00:25:22 Dryness is essential to avoid hemolysis,
00:25:26 the rupturing of the red blood cells and liberation of its hemoglobin.
00:25:30 Hemolysis interferes with several of our chemistry tests
00:25:33 including potassium and bilirubin.
00:25:37 Hemolysis can also be caused by rough treatment of the blood
00:25:41 during its collection.
00:25:45 This can happen if the collecting tube is held too tightly
00:25:49 against the skin as the tube is filled,
00:25:53 thereby mechanically damaging the cells,
00:25:57 or if the tube is scraped against the puncture site.
00:26:00 Some excessive centrifugation may also rupture the red blood cells.
00:26:04 The heel is gripped as followed.
00:26:08 Grasp the heel firmly with your forefinger at the arch of the foot
00:26:12 and your thumb placed well below the puncture site at the ankle.
00:26:16 The tip of the lancet must penetrate the skin completely
00:26:20 if the Neolet is used.
00:26:24 This is accomplished by puncturing perpendicularly to the surface of the skin
00:26:27 and in a single motion, whether the heel or finger is being used.
00:26:31 For finger puncture, place your thumb either below or above
00:26:35 and well away from the puncture site as we did for the heel.
00:26:39 Make the puncture in one continuous, deliberate motion
00:26:43 in a direction almost perpendicular to the puncture site.
00:26:47 For both heel and finger puncture,
00:26:51 the first drop of blood formed is considered contaminated
00:26:54 and is wiped away with a sterile pad.
00:26:58 Moderately firm pressure is applied, eased, and reapplied
00:27:02 as drops of blood form.
00:27:06 The appropriate collecting tube is gently placed at the puncture site.
00:27:10 Remember that if you are rough here, hemolysis can occur.
00:27:14 A no-no.
00:27:18 Do not scrape the tube on the skin.
00:27:21 This could be the main cause of hemolysis.
00:27:25 A drop of blood is allowed to flow into the tube.
00:27:29 The tube is then either tapped or flip-shaped gently
00:27:33 to make the blood flow to the bottom.
00:27:37 The trail left by the blood on the tube's surface
00:27:41 serves as a channel for all future drops of blood entering the tube.
00:27:46 For collecting blood gases or ionized calcium,
00:27:49 use a capillary tube
00:27:53 held at a horizontal level at all times to avoid air bubbles.
00:27:58 Mix the blood with the anticoagulant by gently tilting.
00:28:04 Cap the ends of the tube,
00:28:08 then store the capillary tube on ice water in a flat container.
00:28:14 Label the capillary tube
00:28:17 and all other tubes with the computer-generated labels for each patient.
00:28:22 A question often asked is,
00:28:26 how much blood can you expect to get from a skin puncture?
00:28:30 A study made in our lab showed that the average volume
00:28:34 obtained from the puncture of a newborn seal is about 400 microliters,
00:28:38 but the volume actually needed to fill the average number of tests requested
00:28:42 is about 10 to 15 percent greater than this.
00:28:45 Therefore, we have to do a second skin puncture to get enough blood.
00:28:49 This is true for 40 percent of the newborns.
00:28:53 Another way of stating this is that you must perform 14 punctures
00:28:57 to fill 10 lab requests on newborn patients.
00:29:01 That is an unpleasant fact that we must face.
00:29:05 As a child gets older and we use fingers for skin puncture,
00:29:09 we generally get at least 10 percent more blood than from the newborn's heel,
00:29:12 and the number of repeat punctures declines.
00:29:16 Teenagers require only about 11 punctures to fill 10 requests.
00:29:20 Treat every repeat puncture as though it were the first.
00:29:24 Never, never reuse the previous site of puncture.
00:29:28 This not only widens the hole that has already been made,
00:29:32 but increases the chances of infection considerably.
00:29:37 The one fatal case of septic osteomyelitis
00:29:40 that Dr. Reiner mentioned was attributed to multiple punctures
00:29:44 via the same site on a newborn's heel.
00:29:48 Another, never, never put a plastic adhesive band-aid on the heel of an infant.
00:29:52 This can cause the skin to be torn when the adhesive is pulled off.
00:29:56 It also promotes the danger that the child will chew on it
00:30:00 and possibly aspirate and choke on it.
00:45:38 You have now seen a detailed explanation of all aspects of skin puncture,
00:45:42 including a start-to-finish scenario of a skin puncture.
00:45:46 Let's review some of these highlights.
00:45:49 Have a properly loaded, clean collecting tray with the draw list and labels available.
00:45:55 Wash your hands and put on a clean gown before going to the bedside.
00:45:59 Wash after each patient is completed.
00:46:02 Change gloves for each collection.
00:46:05 Follow the instructions given, specifically for patients on special units
00:46:09 such as isolation units and the burn unit.
00:46:12 Be certain of the patient's identity,
00:46:14 even if you must ask the patient's nurse or the charge nurse.
00:46:17 Do not use the bed or door name tag for identification.
00:46:22 Perform the skin puncture on the heel only in the designated areas
00:46:27 and with the techniques that have been described.
00:46:30 Never use an area where edema is present.
00:46:34 After filling the appropriate collecting tubes,
00:46:36 maintain pressure on the puncture site with a sterile pad until the bleeding stops.
00:46:41 Never leave the patient until that is accomplished,
00:46:43 even if it takes 15 to 20 minutes.
00:46:46 After returning to the lab,
00:46:48 verify the blood collection at any of the appropriate terminals
00:46:51 and distribute the labeled tubes to the appropriate lab sections.
00:46:55 A final note that you cannot forget.
00:46:57 You will not always get enough blood for all the tests ordered from a single skin puncture.
00:47:03 Therefore, you must make a fresh puncture with a new sterile lancet
00:47:07 in another clean and dry area of the heel or finger.
00:47:11 As previously mentioned for the newborn,
00:47:13 you will have to make approximately 14 punctures for every 10 orders that you have to fill.
00:47:19 The overall average in this hospital is 13 punctures for every 10 orders,
00:47:24 but never make the second puncture in a site previously used.
00:47:28 These are the sad facts of life
00:47:30 that our most experienced blood collectors must face every day.
00:47:34 We have no choice in this matter.
00:47:37 And now some concluding remarks.
00:47:39 We maintain a collection of articles on skin puncture and blood collection.
00:47:43 If you wish to consult this literature,
00:47:45 do not hesitate to call me and I'll loan you the information.
00:47:48 Even more, we welcome your direct questions at any time.
00:47:51 Our experienced staff of blood collectors is at your service.
00:47:55 There are no secrets in blood collection.
00:47:57 We are eager that all of our staff approach the patient
00:48:00 with the same knowledge and identical techniques of skin puncture.
00:48:03 We strive to be consistent, uniform, and standardized.
00:48:07 With practice and experience, you too may become adept at skin puncture,
00:48:11 particularly of the newborn.
00:48:13 I will end this talk by giving you a quiz.
00:48:16 Take a careful look at both heels of this 10-day-old premature newborn.
00:48:21 Disregard the parent bruising involved.
00:48:23 Can you tell what errors were committed during the skin punctures involved?
00:48:29 If you can't see what is wrong with the skin punctures in this slide,
00:48:33 then you had better review the techniques taught in this session.
00:48:37 ♪
00:49:07 ♪
00:49:37 ♪
Please note that this video contains footage of blood being drawn from adults and infants and a still image of the feet of a deceased infant.
This training video produced by the Children's Hospital in Columbus, Ohio teaches phlebotomists how to draw blood via skin puncture of the heels of newborns and infants, a safer and easier method than using veins and arteries. Daniel Mann, Administrative Director of Laboratory Services at the Children's Hospital, narrates the video, and Dr. Charles Reiner explains why the heel is the best puncture point for newborns and infants. A group of hospital laboratory staff (Carlotta Thompson, Debbie Messer-Wright, Teresa Cooper, and Karis Glassco) demonstrate proper techniques on an adult's finger. The last 20 minutes of the video are silent footage of a blood draw on an infant.
| Property | Value |
|---|---|
| Creator of work | |
| Provenance |
Donated to the Science History Institute by Dr. Samuel Mites in 2001. |
| Place of creation | |
| Format | |
| Genre | |
| Medium | |
| Extent |
|
| Language | |
| Subject | |
| Rights | In Copyright |
| Rights holder |
|
| Credit line |
|
| Digitization funder |
|
Institutional location
| Department | |
|---|---|
| Collection | |
| Series arrangement |
|
| Physical container |
|
View collection guide View in library catalog
Related Items


Cite as
Children's Hospital (Columbus, Ohio). “Skin Puncture and Blood Collection for Infants.” Vhs, 1990. American Association for Clinical Chemistry Records, Box 7. Science History Institute. Philadelphia. https://digital.sciencehistory.org/works/p0k2psw.
This citation is automatically generated and may contain errors.